See the Translations Page for the status of each. If a translation corresponding to your system's native language has already been included into UNetbootin, it should automatically load the corresponding translation. If you'd like to help translate this website, join the project on Transifex , then edit translations either on this website or on Transifex. If you'd like to help translate the UNetbootin program itself, please use Launchpad Translations. If you are new to Launchpad, you will first have to join the corresponding Ubuntu Translators group for the language you intend to translate.
For information on using the Launchpad Translations system, see the translations help page. If using Windows, UNetbootin should prompt you to remove it the next time you boot into Windows. If using Linux, re-run the UNetbootin executable with root priveledges , and press OK when prompted to uninstall. Removal is only required if you used the "Hard Drive" installation mode; to remove the bootloader from a USB drive, back up its contents and reformat it.
Uninstalling UNetbootin simply removes the UNetbootin entry from your boot menu; if you installed an operating system to a partition using UNetbootin, removing UNetbootin will not remove the OS. Please note: since OS X The app now has a new user interface that looks slightly different on Yosemite or earlier OS X versions. Step 1: Open Disk Utility. Note: right below your device name, it also shows information about the drive e.
What you need
You may also change the device name if you want. Kind reminder: make sure you have backed up the data before you do this. Step 4: Wait until the erasing process to complete. It should be very quick only a few seconds to format my 32GB Lexar drive. Step 5: This step is optional. I saved several files to the disk, and open Disk Utility again.
If you are on an earlier operating system like Windows 7, XP, etc. The screenshots may look slightly different.
How to create a Windows 10 installer USB drive from a Mac | Windows Central
Step 2: A new window pops up prompting options you need to select before starting. Pro tip : chances are that you may encounter some issues formatting a flash drive on a PC or the disk is malfunctioning.
- download prop hunt for mac.
- xcom enemy within download mac.
- load game free for mac.
- insufficient disk space mac gopro.
- maple 16 mac full download.
If so, the following articles may be of help to you:. Most of the external hard disks and flash drives are formatted for Microsoft Windows operating systems.
How to Create Bootable USB Installer for Mac OSX on Windows 10?
That makes using the drive a bit troublesome on Mac machines. Hope the above guide is helpful to you. Influenced by the startup culture in the Silicon Valley, Jessica loves building things from zero to one and is keen on following news related to the Big Five tech giants and many SaaS startups.
- view cache files safari mac.
- football manager save game editor mac.
- adobe cs3 mac uninstaller download.
- Using Unetbootin?
- Subscribe to RSS.
Mine can only be formatted in NTFS. Thank you Jessica for the informative article. Replace the real path to Windows iso file. If you typed the wrong command, all the data on the selected drive would be erased and all data being vanished in seconds. So it is not ideal solution for beginners who don't know much technical staff. People are more willing to use tools that fix the certain issue at minimal effort. It is a market-leading application for burning ISO files and creating bootable media. Its flexibility allows you to choose your storage medium and change burn settings in an easy manner. The utility is fully tested on the world's top PC brands running all the recent versions of Windows.
The most important features are the high burn success rate and the simple UI that allows even novice users to quickly burn bootable ISO files to a disk or USB flash drive. The process has been described in detail below:. You need to input the user password before opening the program to authorize the permission. After that, you will see a clean user interface like this. When you launch the software, you will see multiple options on the home page. Click on "Burn" to create the bootable disk.
Subscribe to RSS
In the next window, select the bootable ISO file in the top section, and then the appropriate storage medium. Now click on "Burn" after choosing the USB option. The bootable drive will be created in a few moments, and you can use it for Windows installations and other purposes. There's no confusion with advanced settings, no command line work and no other tools required to complete the process. The formatting is done by the software itself, so the user doesn't have to worry about lengthy and complex actions.
- usb wifi adapter power mac g5.
- UNetbootin.
- Part 2. How to Create A Bootable Windows 10/8/7 USB on Mac without Bootcamp?
- microsoft wireless keyboard 800 driver mac.
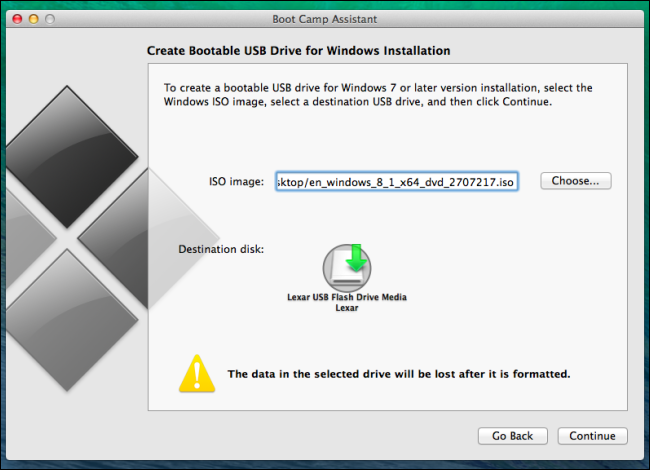
- How to create a Windows 10 installer USB drive from a Mac.
- Before you begin?
You won't want to wait for an hour and found out the USB was useless becasue it couldn't boot Windows from it, right? The Command Prompt is an extremely useful utility in Windows, but you have to know what you're doing. Command improperly executed can lead you to several issues down the road. Therefore, you need to be confident in doing command line work in order to use this method. You can certainly try it if you are a novice, but that may not be the recommended course of action.