If you are luckily using Windows 10 for the time being, then you are at the bay of advantage to create your Tutorials without any third party tools usage, but how? Well are coming to it. Windows 10 has a secret screen recording pre-installed tool, called Game Bar. This was primarily designed to record video game activities for staunch gamers, but you can bend it to use for other purposes as well.
And this is exactly what we are going to do here. Just follow the steps as given below:. It only differs in circumstances and you make your choice either with game bar or ScreenGeeker or PowerPoint. But whichever method you are employing, follow the steps as accurately as mentioned to avoid any mistake in operation and also in the captured video. If you have a better way to make an instructional video with screen recording, let us konw!
10 Replies to “How to Record Your Screen and Make a Video…”
Home Products Store Tutorial Support. Sign in. Log into your account. Password recovery.
Windows Share on Facebook. Stay Connected.
How to Record Your Screen and Make a Video Tutorial - Learn to code in 30 Days
Then, find a quiet place to record. The Camtasia video editor makes it simple to record your voice over with with built-in voice narration.
- free dynamic dns services mac;
- Step 2: Record Your Computer Screen with Audio.
- Video Tutorial Software | CloudApp.
- Create slideshows in Photos on Mac.
- convert txt to csv mac;
Simply pause and start again right before you made the mistake. The next step is recording your screen video.
Top 10 Best Free Video Editing Software in 12222 for Mac Users
Open the application you want to record and walk through exactly what you want to show your viewers. Remember, if you make a mistake, simply pause You can always edit it out in the end. To start, cut out mistakes and trim extra footage from the ends of your recording. When finished, bring in your audio narration and any other media needed for the project. With your audio narration on the timeline, use clip speed and extend frame to sync the pace of your video with your narration.
For example, if you need more time to explain a concept, split the clip and use extend frame to freeze the video. Or if you want to speed up a boring part of your recording, add clip speed, then drag the handles to speed it up. The last step in creating a tutorial is to save the video.
Think about where you want this video to live and choose a share destination. As an extra last step, we recommend sharing your video with a few people to get feedback. This is a great way to make sure your message is clear, and your video is accomplishing your goals. Learn how to use the Canvas and Timeline to make basics edits to your video. Learn to work with media on the Canvas and adjust their properties in the properties panel.
Learn to export a project as a video file on your computer or share it to popular web destinations. Windows Mac. Your cart is empty. Unable to add items to cart. Okay, let's have a look at how it works!
- mac os x stackshot process;
- Video Tutorial Software.
- Upgrade to get an extensive suite of video editing tools.
While I was searching for a tool that would be suffice for my screen recording and video tutorial requirements, I came across ApowerREC. This is a well rounded application that offers variety of functions aside from screen recording. There is no complex procedure to operate this tool. To record your screen and audio, simply get this screen recorder from the download link provided above. After that open the program or video that you need to capture, and then choose a recording mode that you wish to use.
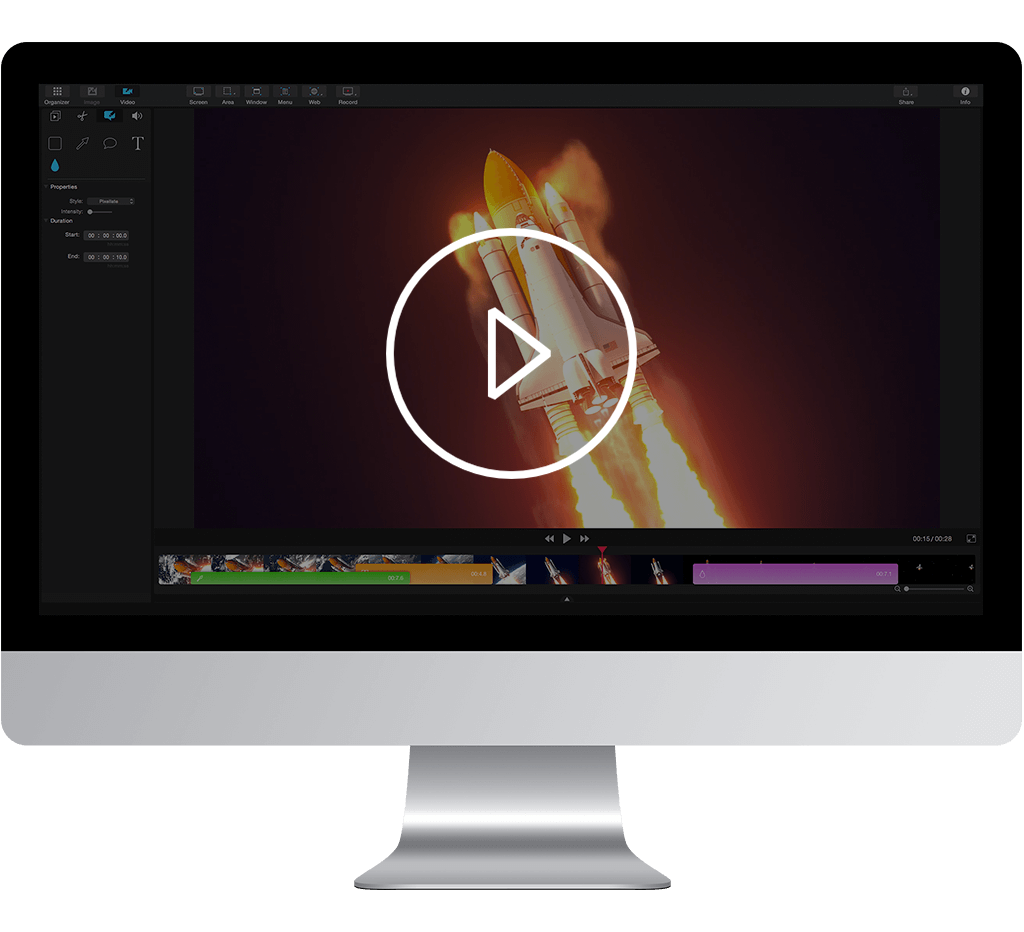
To add some marks or text while capturing your screen, this program has built-in annotating functions that you can use by accessing it from the recording toolbar. Moreover, a webcam recording is also supported by this program which is beneficial if you want to show your camera while you discuss something in your video. From here you can edit your video and add some intro and outro, trim some unwanted parts, and add watermarks.
It is indeed an all in one application that can help you make a great video tutorial. Editing your video recording is the second step. In order to make the recordings more vivid, sometimes you need to polish the video with techniques, such as combining and trimming video clips, as well as adding photos, background music, a title, credits, captions, text, visual effects, or animations. Then, Windows Live Movie Maker will cover your basic needs.
Immediately after importing the video into Live Movie Maker, it will appear in the right pane.