The installation described here is on a inch Retina iMac running macOS Sierra , but the process should work for any Mac released after If you plan to use an older Mac, you should still be able to install Ubuntu, but you need to pay attention to how the boot process works for older hardware. If you have problems getting your older Mac to work with Ubuntu, stop by the Ubuntu forums and search for install guides for your Mac model.
Multi-Boot and Multi-OS on Mac Pro – the best way.
The flash drive is used as a bootable Ubuntu installer that contains not only the basic installer but also a live version of Ubuntu that you can run directly from the USB flash drive without modifying anything on your Mac. This is a great way to test whether your Mac and Ubuntu can get along.
A USB keyboard and mouse. You need a USB-based keyboard and mouse because it's highly likely that the Ubuntu Bluetooth drivers will need to be installed or updated before a wireless keyboard or mouse can work. This is the minimum size recommended for the desktop version of Ubuntu; more space to work with can be a benefit. Ubuntu This is the current stable version of Ubuntu that was available when we started this project. Later versions should work as well. Check the release notes for any specific changes that may affect installation or use on your Mac.
The following process completely erases any data you have on the USB flash drive. Locate the flash drive in Disk Utility's sidebar. Select the actual flash drive and not the formatted volume that may appear just below the flash drive's manufacturer name. Click Erase in the Disk Utility toolbar. Click Erase. When the process is complete, click Done. Before you leave Disk Utility , make a note of the flash drive's device name.
You should see the device name, such as disk2s2, or similar. Write down the device name. You need it later. Quit Disk Utility. The utility downloads as a disk image, with the name unetbootin-mac The actual number in the file name may change as newer versions are released. Locate the downloaded UNetbootin disk image. It is probably in your Downloads folder. Double-click the.
The UNetbootin image opens. The app works just fine from within the disk image. Launch UNetbootin by right-clicking on the unetbootin app and selecting Open from the popup menu. Use this method to launch the app because the developer isn't a registered Apple developer, and your Mac's security settings may prevent the app from launching.
This method of launching the app bypasses the basic security settings without having to go into the System Preferences to change them. Your Mac's security system will still warn you about the developer of the app being unrecognized and ask if you really want to run the app. Click Open. A dialog box open, saying osascript wants to make changes. Enter your administrator password and click OK. The UNetbootin window opens. Do not choose the ISO option.
2. Create Your Ubuntu Installation Drive
It can, however, properly create the bootable USB drive when it downloads the Linux files from within the app. Make sure Distribution is selected and then use the Select Distribution drop-down menu to pick the Linux distribution you want to install on the USB flash drive. For this project, select Ubuntu. Use the Select Version drop-down menu to select Some early Intel Macs used bit architecture, and you may need to choose the This can be helpful if you have issues with the live USB running correctly on your Mac or with drivers such as Wi-Fi, Display, or Bluetooth not working.
The Type menu should be populated with USB Drive , and the Drive should match up to the device name you made a note of earlier when you were formatting the USB flash drive.
- minitab 16 download free for mac;
- How to install Linux on a Macintosh and dual boot with macOS — The Ultimate Linux Newbie Guide;
- sims 4 activation code free mac;
UNetbootin downloads the selected Linux distribution, creates the live Linux install files, creates the bootloader, and copies them to your USB flash drive. Click the Exit button. If you plan on using an entire drive for Ubuntu, use the formatting guide:. In the Terminal window that opens, enter the following: csrutil disable Press Enter or Return.
Restart your Mac. When the download completes, you can find it in a folder named refind-bin The number at the end of the folder name may change as new versions are released. Open the refind-bin Arrange the Terminal window and the refind-bin Drag the file named refind-install from the refind-bin In the Terminal window, press Enter or Return. Press Enter or Return. Close Terminal. Shut down your Mac. Do not restart. Use the Shut Down command.
Dual-Boot macOS on a drive with Windows 10 already installed (Shared Drive) - Hackintosher
Another of the common issues is missing Bluetooth drivers, which prevent your wireless keyboard and mouse from being used. If possible, connect your Mac to your home network via a wired Ethernet port. This is for the same reason as the wireless keyboard or mouse. The Wi-Fi drivers may need to be updated or added to get your wireless network working.
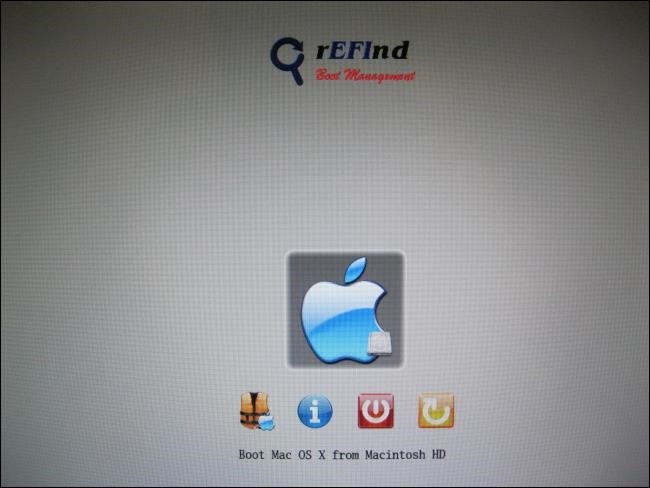
If you're ready, let's give it the boot. Shut down or restart your Mac. If you installed rEFInd, the boot manager automatically appears. If you chose not to use rEFInd, then as soon as your Mac starts to boot up, hold down the Option key. Keep holding it down until you see the Mac's boot manager display a list of available devices you can start up from. You may also want to remove all peripherals from your Mac, except the mouse, keyboard, USB live flash drive, and wired Ethernet connection.
You'll see a basic text display with at least four entries: Try Ubuntu without installing it. Install Ubuntu. OEM install for manufacturers. Check disc for defects. Use the arrow keys to select Try Ubuntu without installing and then press Enter or Return. The display goes dark for a short time and then displays a Ubuntu splash screen, followed by the Ubuntu desktop. The total time for this should be 30 seconds to a few minutes. If you must wait longer than five minutes, there's likely a graphics problem.
- How to Install MacOS Catalina Beta on APFS Volume to Dual Boot with Mojave.
- pinnacle studio 12 compatible mac;
- gt 520 driver for mac;
- Getting Linux running on your Mac.
- How to install Windows 10 on Mac.
If your display remains black, you never leave the Ubuntu splash screen, or the display becomes unreadable, you likely have a graphics driver problem. You can fix this by modifying the Ubuntu boot loader command as outlined below. Shut down your Mac by pressing and holding the Power button. After the Mac shuts down, restart and return to the GRUB boot loader screen using the instructions above. Select Try Ubuntu without installing but do not press the Enter or Return key. Instead, press the 'e' key to enter an editor that allows you to make changes to the boot loader commands.
The editor contains a few lines of text. There should be a space between splash and nomodeset and a space between nomodeset and Press F10 to boot with the new settings. If you're ready, double-click the Install Ubuntu icon. Select the language to use and then click Continue. Allow the installer to download updates as needed, for both the Ubuntu OS as well as drivers you may need. Place a check mark in the Download Updates while installing Ubuntu check box and in the Install third-party software for graphics and Wi-Fi hardware, Flash, MP3, and other media check box.
Click the Continue button.