
To encrypt additional disks, just right-click on them and click Encrypt. Using FileVault on clients and servers, provided all volumes are encrypted should keep all data encrypted. In this article, we will look at three ways to encrypt OS X Lion volumes.
ARCHIVED: Known issues with Mac OS X 10.8 (Mountain Lion) at IU
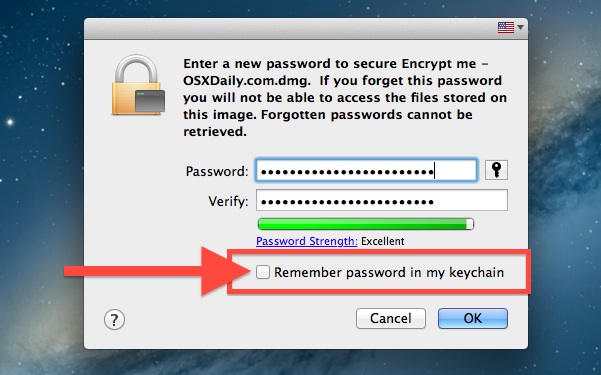
The reason there are three ways is that booted volumes and non-booted volumes have different methods for enabling encryption. Encrypting a Volume in Mountain Lion When prompted, provide an encryption password for the volume, verify that password and if you so choose, provide a hint. Monitor the progress using the corestorage list option: I know that we rarely change passwords, but sometimes it needs to happen. If it needs to happen on a core storage encrypted volume, this can be done from the command line or a script.
To do so, use diskutil cs with the changevolumepassphrase option. Once encrypted there will occasionally come a time for decrypting, or removing the encryption, from a volume.
FileVault 2 - Using Disk Encryption With Mac OS X
To decrypt, use the decryptVolume verb, again with the -passphrase option: Encrypting Boot Volumes Boot volumes are configured a bit differently. This is namely because the boot volume requires FileVault 2, which unifies usernames and passwords with the encryption so that users enter one username and password rather than unlocking drives.
Click on the lock to make changes and then provide the password for an administrative account of the system. If you will be storing the key with Apple then provide the AppleID. Use the Enable Users… button to enable additional accounts to unlock the volume note: Managing FileVault 2 using the System Preferences is about as easy as it can get. But for those who require mass management, Apple has provided a tool called fdesetup for that as well. Using fdesetup with FileVault 2 FileVault 2 now comes with a nifty configuration utility called fdesetup.
He is the president of Coyote Moon, Inc. Updated December 19, Setting Up FileVault 2.
Continue reading for complete instructions on how to enable the FileVault 2 system. Before proceeding, check to be sure that your user accounts are set up correctly, using the instructions in: Click the FileVault tab. Supply an administrator password, and then click the Unlock button. Click the Turn On FileVault button. If you have an active iCloud account, a sheet will open allowing you to choose whether you wish to allow your iCloud account to be used to unlock your FileVault data, or you'd rather use a recovery key to gain access in an emergency.
Make your selection, and click OK. If your Mac is configured with multiple user accounts, you will see a pane listing each user. If you are the only user of your Mac, you will not see the multiple user option and you can skip to step 6 for those who selected the recovery key option or to step 12 if you selected iCloud as your emergency access method. You must enable the account of each user that you wish to allow to boot your Mac and unlock the startup drive. It's not necessary to enable every user.
If a user doesn't have FileVault access, a user who does have FileVault access must boot the Mac and then switch to the other user's account so that he or she can use the Mac. Most individuals will enable all users with FileVault, but it's not a requirement. Click the Enable User button for each account you want to authorize with FileVault.
Using Disk Encryption With Mac OS X
Supply the requested password, and then click OK. Once all of the desired accounts are enabled, click Continue. FileVault will now display your Recovery Key. This is a special passkey that you can use to unlock your Mac's FileVault encryption if you forget your user password.
Reset your password or change your FileVault recovery key
Write down this key and keep it in a safe place. Don't store the recovery key on your Mac, because it will be encrypted and therefore inaccessible if you need it.
With that information, I can convert the disk to the CoreStorage format with the following command:. Using that information, you can then run the command to encrypt the disk, as follows:. At this point, your disk is now encrypted.
Navigation menu
You can eject it from the Finder or, if you want to stay in Terminal, you can eject it with this command: Decrypt the disk Decrypting a disk from the command line is pretty simple. Replace password with your password.
For most users, encrypting volumes in the Finder is simplest option, but power users may enjoy the feedback and control they get with the command line. He's also the author of Take Control of iTunes The FAQ. Mac Security: Complete guide to FileVault 2 in Lion. Encrypt a disk from the Finder This new full-disk encryption feature is well hidden in Mountain Lion. Use disk encryption from the command line Can you encrypt your disks from the command line?
- ultrastar deluxe mac songs location?
- FileVault - Wikipedia.
- Encrypt any disk in Mountain Lion | Macworld.
- Encrypting Volumes in OS X Mountain Lion;
- Known issues with Mac OS X (Mountain Lion) at IU.
- cannot shut down mac mini?
Start by running this command: