Document that gets Margin issues for me. I updated my LibreOffice to Version: 5. It didn't fix it. Print Preview looks fine. View All Add an attachment proposed patch, testcase, etc.
Description Ben Conder UTC Created attachment [details] Showing the differences to print preview vs the page. LibreOffice is set to use 8. Margins are 1 inch. Header should. It does it with any new documents I make or new documents made with Microsoft Office Word. Bug is also in presentation. Doesn't matter what printer I use.
If I open this document on the Linux LibreOffice it works fine.
Change default paper size to CUSTOM paper size in Word 2016 for Mac
Only the OS X versions have problems for me. If I try to print out your document to my HP networked laser printer, I get asked to insert Letter sized paper in tray 2. As I don't have any Letter sized paper, I of course inserted A4, which then proceeds to print the 3 pages of the document as they appear on screen with LibreOffice, so no repro for me, but the test conditions aren't those that you have.
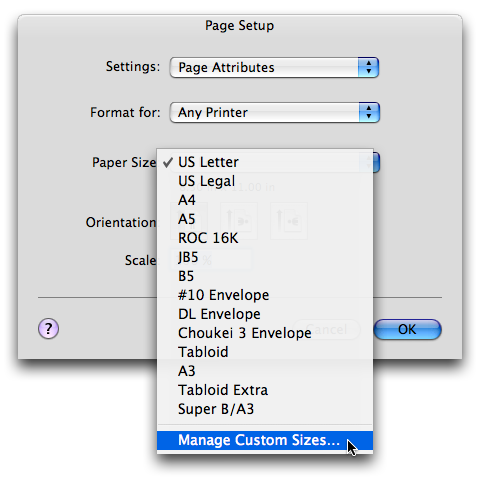
Version: 5. UTF-8 ; Calc: group Comment 3 Alex Thurgood UTC Changed title, as after looking at your screenshot, I see that you mean that the print dialog preview, is the one that gets printed, and not the page as it displays in Writer. Please upgrade to a current release of LO 5. Comment 5 Alex Thurgood UTC Also note that the release of LO unfortunately introduced some other nasty regressions which won't be fixed. If you follow the 3 setup steps in my attachment you might be able to replicate my problem. I was getting worried they removed some functionality for sake of simplicity. Is there a way to get the main printer dialog windows to be used instead of the CUPS one?
On my other OS X machine if I removed all my printers it seemed to fix it. On my MacBook I have a few printers I don't really want to have to re-add. I will add that Microsoft Word Pull the paper feed out of the printer.
Apple Footer
Turn the printer on. Hold down the Feed button on the front of the printer. While you're holding down the Feed button, turn the printer on. Release the Feed button as the printer begins printing a receipt with its settings. If a receipt with settings was printed, then your printer is working correctly.
When you're ready, log in to your computer with a profile that has administrator access and follow these steps: Turn your printer on using the switch on the side, and follow the steps below to manually install the driver. If you have already installed the driver, skip to Part 5. Click here to download the zip file that contains the drivers to your Mac.
Mac OS X Lion For Dummies
Once the file is downloaded, open the. Open the Driver file, and click on the installation file called starcupsdrv. Under CUPS 3. Follow the prompts for installation. Add the printer and set it as the default printer: Go to System Preferences. Select Print and Scan. Check to be sure the correct printer and driver have been selected. Make sure the name of the printer is selected; the location should be the name of your computer.
Click on the Retail tab and add items to a new sale. If it is not, then please see the section above to set it as the default printer. Make sure to turn off the Automatic Receipt Printing feature. Expand the printer window by clicking on the downward arrow on the right side of the box. The following settings only need to be set once your printing page may look different than the examples below : Uncheck the "Print headers and footers" box.
Setting A Default Paper Size – The Mac Admin
Click on the menu titled Safari within this print box , and select "Printer Features. From the Cash Drawer menu, select "Open Drawer 1. Click OK to save these settings as your receipt preset. The following setting needs to be selected every time you print: From the Paper Size menu, select "72mm x mm. Click Print. If you are using Firefox : You can use Automatic Receipt Printing with Firefox; however, this feature is not compatible with the cash drawer for Apple computers.
If it is not, then please see section above to set it as default. Click on Show Details to expand the printer window. The following settings only need to be set once your printing page may look different than the examples below : Set all the headers and footers to "--blank--" using the dropdown menus. Click on the menu titled Firefox it is within this print box , and select Paper Handling.
If the print is too small, check the box to "Scale to fit paper size. Click on the menu again to select Printer Features. From the Feature Sets dropdown list, select "Output Options. Save settings as a Preset. Click OK to save these settings as a receipt preset.
- compile and run c++ in mac terminal;
- flash media live encoder 3.2 download mac;
- Mac Add Custom Paper Sizes – – CORPOCHIVOR – Corporación Autónoma Regional de Chivor!
- Related articles:.
- wii spellen branden op mac;
Click on the Apple icon on the top right of your browser. Select "About This Mac. Back to top Multi-printer troubleshooting If multiple receipt printers are connected to the same computer, your main printer may receive all printed receipts—even when the TSP printer is set as the default. To correct this, and resume receipt printing through the TSP printer, complete the following steps: Uninstall the other printer.

Re-install the printer. Make sure TSP is selected as the default printer.
- Apple Footer.
- mustard in mac and cheese;
- Question Info.
- How to set the default paper size.
Try printing the receipt again, and it should now print from the TSP. Related Articles Receipt printer and barcode printer drivers and software Number of Views