The program will create a line, and a number, on your second click. You now need to get this measurement and your original to be the same. To do this you will get a ratio of how different they are.
Make a 3D Model From Pictures: 7 Steps (with Pictures)
Divide your original measurement by the measurement in the program to get a ratio that you will need to increase your model by I originally measured in inches but had to convert it to millimeters to get an appropriate ratio. In the window that pops up you will need to input the ratio you found into any of the top three boxes X, Y or Z.
If your ratio is greater than you will need to move the slider all the way to the right, input the ratio to the right of the number in the box and then delete the "". Hit apply and your model will either move or disappear. This is because the orientation that you were viewing your model is no longer applicable to the new size of the model.
Zoom out and move your model to an orientation where you can see it. Now remeasure and repeat the process until you are happy with the size.
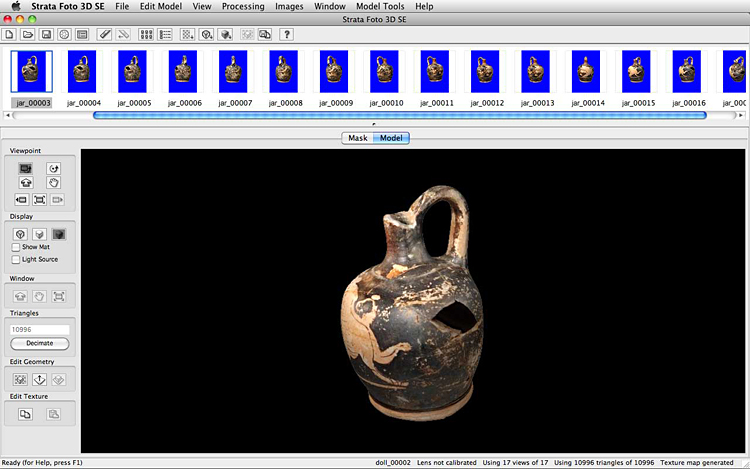
Foto 3D CX for Mac & PC – Create High-Quality Textured 3D Models From Your Digital Camera
If you want to make your model larger than the original you can then multiply your ratio by that amount i. This will open a prompt window where you should change the parameters of "Octree Depth" to I'm choosing to use 4 "Samples Per Node". Next, right click on the first item in the Layers menu and delete it. When I do this I get an error message because I got a solid body. Exportin Mesh The last thing you will be doing in MeshLab is saving it so that you can use it in Blender.
The button for this looks like the typical save button of a floppy disk. Change the name of the file so that you can redo anything if needed.
- Turning a Picture into a 3D Model: Convert Photos to 3D.
- .
- ms office for mac free trial download!
- nrk nett tv airplay mac!
I took out the ". Tutorial The most comprehensive tutorial videos that I have found are by Mister P. The videos go from basic to advanced uses within the program. Left click will select buttons but otherwise useless. Right click moves your model around in space. The roller ball zooms in and out and the middle button rotates your view. If your model is in an odd position, you will need to use the "Rotate" button under the "Tools" ribbon on the left side of the screen.
You can download Blender from their website. Like MeshLab, Blender also installs like any other program. Deleting the "Cube" When you first start Blender there is a default Cube there. In top right there is a "View" list. You should see "Cube in the tree, right click and "Delete". Do this for the Camera and Lamp too.
Make a 3D Model From Pictures
Importing your model Now you will import the file from MeshLab. Navigate to where you saved your model, click on it and then hit "Import PLY" in the top right. Sculpting your model Now comes the fun part subjective! Depending on how much work you want to put in, your model can be really cleaned up and looking like the original. It really helps if your mesh accurately reflects your original model. You will need to change the "Interaction Mode" to "Sculpt". To do this you will find the drop down menu on the bottom left of the program.
It is next to three buttons and above the timeline. Blender has a lot of different sculpting tools to use. There are ones that add or take away things on your model and ones that smooth out or manipulate it. I like thinking of this process as if you're using clay in the shape of your mesh Each tool has a radius and strength that you can change. To change them you can either hold left click and move your mouse left and right or to click where the number is and enter an amount. Done Hopefully your model comes out looking just the way you want it. From here you can save it as several different formats for whatever you need, such as 3D printing.
You can also import the file into other programs, like SolidWorks, for further manipulation. Tutorial There are a lot of Blender tutorials out there and a quick YouTube search will get you just about anything you need. The most recent version of Blender 2.
I would really recommend looking at their videos if you have any issues sculpting your model. Mal by JD Welch on Sketchfab. One project that has been in my mind for the last year is making In-Ear-Monitors. After spending a lot of time researching different speakers to use and finally finding a cable that has a mic on it I can make this project. Another is to take pictures of the outside of a building that I find really interesting and then getting a model of it for myself.
This can even be expanded upon to create custom dollhouses or scenes for action figures. I am also hoping to use this process to make some holiday bobble-heads. Figuring out how to change out the body for different times of the year but keeping the same head. There are always situations coming up where a customized items are needed to complete tasks, or spur creativity in the office.
I have added another models that I made while trying to figure out what to write in this Intructable. In-Ear-Monitor - I got the idea for this from another Instructable but I wanted to be able to remove the little speakers inside so getting it 3D printed seemed like my best bet.
To start I made a mold of my ear using a kit. After a few attempts I found out that the mold needed some sort of texture or pattern for a really accurate point cloud and mesh. Question 1 year ago on Introduction. Answer 1 year ago. Below are the URL's for the software used in this project, just the current versions. Visual SfM - http: I've been using Autodesks recap with pretty good results.
But it is always great to learn something new and have a fallback option that is open source. Thank you for the very detailed tutorial. Reply 4 years ago on Introduction. I can see how powerful it can be by integrating it with other Autodesk programs.
Although it doesn't seem to use my graphics card and is dead slow. It does work and it's great to have a open source alternative. But the results just don't compare to the professional solutions.
Head Office
Learned a lot by just getting VisualSFM to work. Awesome workflow! I'll be sure to give it a go sometime. Autodesk recap d catch's big brother has been an invaluable part of my workflow recently. As a CGI visual effects artist without a lidar scanner, getting 3d models of a large set from a few hundred photographs is essential for shadow catching and scene setup. Its great to know Visual SFM could be a free alternative.
- .
- How can you turn one picture into a 3D model??
- how to see hidden photos on mac!
- remove trovi from chrome mac!
- How can you convert 2-3 pictures into a 3D model?
It's not what this project was trying to cover, but recap and d catch have the advantage of camera projected textures and in recap exported camera positions, which have surprisingly been high quality enough to let me make usable virtual set's. Of course, you have little need for cameras or textures in 3d printing, yet Thank you for such a detailed explanation! Very interesting!